Creating Pull to Dismiss / Pull to Reach animation using Swift
One of my most used app on my iPhone is Bear app. It’s a beautiful and simple notes-taking app with tons of neat UI / UX features. One of which is being able to pull down on a scroll view to dismiss a view or select a button. As phones are getting taller, buttons on the top navigation bar are getting difficult to access using just one hand. Such gestures help users access these buttons just by swiping down or scrolling down on a scroll view which is embedded in collection view or tableviews by default.
Not only accessing navigation items, you can dismiss views containing scroll views by similar gestures. I decided to create such an animation and in this post I will take you through the entire process of analyzing the animation and then building it from scratch.
Complete project is available on GitHub. I have also incorporated protocol / delegate so that I can communicate between the pop up view and the controller. More on this later.
The project also contains some code through which I am setting up the view controller, applying dark view on the background and animating the pop up view as the user taps on the “Action” button in the top navigation bar. We are going to dismiss this view by using scroll view which is embedded in that view.
I am creating the pop up view in a separate file that goes by the name of ActionMenu. I have wrapped it in a NSObject subclass. The entire animation of the pop up view appearing from the bottom of the screen, creating the UI components and the entire code for this particular animation is written in this NSObject class file. Through the use of encapsulation, we are creating an instance of this class in the view controller and calling the configureActionMenu() and showActionMenu() functions when the “Action” button is tapped.
The code in the UIViewController file to call the ActionMenu when the action button is tapped.
  lazy var actionMenu : ActionMenu = {
        let menu = ActionMenu()
        menu.delegate = self
        return menu
    }()
and then in the selector function of handleActionButton():
  @objc func handleActionButton() {
        actionMenu.configureActionMenu()
        actionMenu.showActionMenu()
    }
Now lets get into the real animation code. I have embedded a scroll view in the action view. I am also conforming the ActionMenu class to the UIScrollViewDelegate so that I can use some Scroll View delegate methods.
The first method we will use is this:
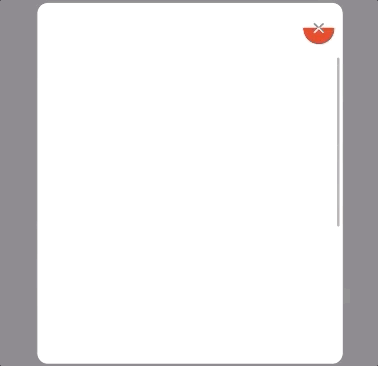
func scrollViewDidScroll(\_ scrollView: UIScrollView) {}So when ever you scroll the scrollView this method will be called. Now before we go any further let’s dissect this animation. The highlight animation works with having two buttons stacked on top of each other. The button on the foreground has a mask layer on it. Remember: When you have a masklayer assigned to a UIView layer then that view alpha becomes 0. So essentially when this mask layer is on the foreground button we can only see the button behind it. Next we will animate this mask so that it goes away as the user scrolls so that we can see the foreground button.
So first set up the two buttons and apply the constraints:
   lazy var cancelButton : UIButton = {
        let button = UIButton(type: .system)
        button.setTitle("✕", for: .normal)
        button.titleLabel?.font = UIFont.systemFont(ofSize: 18)
        button.backgroundColor = .white
        button.setTitleColor(.gray, for: .normal)
        button.translatesAutoresizingMaskIntoConstraints = false
        button.addTarget(self, action: #selector(handleCancelButton), for: .touchUpInside)
        button.layer.cornerRadius = 15
        button.clipsToBounds = true
        return button
    }()

    lazy var cancelButtonForeground : UIButton = {
        let button = UIButton(type: .system)
        button.setTitle("✕", for: .normal)
        button.titleLabel?.font = UIFont.systemFont(ofSize: 18)
        button.backgroundColor = .red
        button.setTitleColor(.white, for: .normal)
        button.translatesAutoresizingMaskIntoConstraints = false
        button.addTarget(self, action: #selector(handleCancelButton), for: .touchUpInside)
        button.layer.cornerRadius = 15
        button.clipsToBounds = true
        return button
    }()

    let maskLayer = CAShapeLayer()
Constraints for the views:
        actionView.addSubview(cancelButton)
        cancelButton.rightAnchor.constraint(equalTo: actionView.rightAnchor, constant: -8).isActive = true
        cancelButton.topAnchor.constraint(equalTo: actionView.topAnchor, constant: 10).isActive = true
        cancelButton.heightAnchor.constraint(equalToConstant: 30).isActive = true
        cancelButton.widthAnchor.constraint(equalToConstant: 30).isActive = true

        actionView.addSubview(cancelButtonForeground)
        cancelButtonForeground.rightAnchor.constraint(equalTo: cancelButton.rightAnchor).isActive = true
        cancelButtonForeground.topAnchor.constraint(equalTo: cancelButton.topAnchor).isActive = true
        cancelButtonForeground.leftAnchor.constraint(equalTo: cancelButton.leftAnchor ).isActive = true
        cancelButtonForeground.bottomAnchor.constraint(equalTo: cancelButton.bottomAnchor).isActive = true
Note how I have created a maskLayer of class CAShapeLayer. I will assign this layer to the cancelButtonForeground.
       cancelButtonForeground.layer.mask = maskLayer
       cancelButtonForeground.layer.masksToBounds = true
Now let’s get back to the UIScrollView method of scrollViewDidScroll() :
 func scrollViewDidScroll(\_ scrollView: UIScrollView) {
        let goal : CGFloat = 80
        let contentOffset =  scrollView.contentOffset.y
        let progress = -contentOffset / goal
        let finalProgress = max(0, min(1, progress))
        updateActionMenu(progress: finalProgress)
}
Now lets see what happening in this method:
First we are setting a goal. How many pixels should the user scroll down for the animation to operate. I have set it to 80. Then we will use scrollView.contentOffset.y to get the value as the person scrolls down. This value is negative, so we will convert it to positive by multiplying it with -1. ContentOffset, put simply, tells us how much content has the user scrolled. Pulling it downwards provides us with values in negative.
Next we are measuring the progress. To do this we are dividing the contentOffset by the goal. This should give us value in decimals. Starting from 0 to more than 1. We want to make sure that the progress is between 0 and 1. To do this we will use max and min methods in swift to restrict the value. If the progress value is more than 1, then return value of 1. If the progress is between 0 and 1 then return the progress value.
let finalProgress = max(0, min(1, progress))min(1, progress) return the progress value which is minimum. If progress is more than 1 return 1.
max(0, min(1, progress)) what ever the value we get from the min function, return the max value between it and 0.
Next we have created a custom updateActionMenu function that takes in the finalprogress as the parameter. This finalprogress will be a CGFloat item between 0 and 1. Now we can use these values to animate the mask layer.
func updateActionMenu(progress: CGFloat) {
        let height = cancelButtonForeground.frame.height \*progress
        let buttonrect = CGRect(x: 0, y: cancelButtonForeground.frame.height, width: cancelButtonForeground.frame.width, height: -height)
        let mask = UIBezierPath(rect: buttonrect)
        maskLayer.path = mask.cgPath
      ...
This updateActionMenu function gets the progress value. We use that progress value to create a path for the mask. Currently our mask has no path so therefore it is hiding the foreground button fully. We will give it a path by constructing it using UIBezierPath. We will create it using CGRect, and change the height of the rect using the progress value.
let height = cancelButtonForeground.frame.height \*progressUse this height when create the buttonRect.
let buttonrect = CGRect(x: 0, y: cancelButtonForeground.frame.height, width: cancelButtonForeground.frame.width, height: -height)Create the mask from the UIBezierPath and add that path as .cgPath to the maskLayer.path. Essentially as the height of the mask increase, it will show the UIView layer behind it. When the progress becomes 1, the entire button will be visible.
So with this amount of code, we get this:
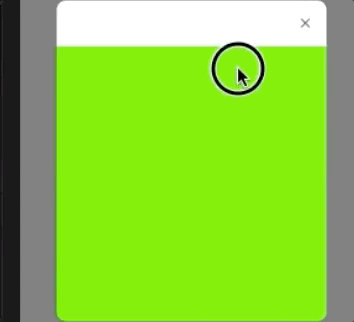
Hoorayy! 🎉
However, we are still not done. We also need to increase the scale the button as we are scrolling. This means that we have three animation states.
notStarted - progress value should be 0 at this point.
highlightFull - progress value can be anything at this point - I went for 0.75. By this progress value, the foreground button should be visible.
finalFull - progress value should be 1 here. Between highlightFull and finalFull - the scale value of the button should change
Let’s implement these changes, starting with progress. So now we want to completely highlight the button when the progress is 0.75.
 func updateActionMenu(progress: CGFloat) {
        let newgoal : CGFloat = 0.75
        let newprogress = progress / newgoal
        let finalProgress = max(0, min(1, newprogress))
        let height = cancelButtonForeground.frame.height \* finalProgress
        let buttonrect = CGRect(x: 0, y: cancelButtonForeground.frame.height, width: cancelButtonForeground.frame.width, height: -height)
        print(buttonrect)
        let mask = UIBezierPath(rect: buttonrect)
        maskLayer.path = mask.cgPath
        ...
Going for a pretty similar logic as before. I am dividing the progress by newgoal of 0.75. The value of newProgress is between 0 and 1. Again I am using the max and min methods to make sure that the max value is 1 and the min is 0.
Then I am using the finalProgress variable to change the height of the mask path. So now by the time 75% of the 80 pixels have been scrolled the highlight animation is fully completed. Now when the progress value is more than 0.75 we want to scale up the button.
    func updateActionMenu(progress: CGFloat) {
        let newgoal : CGFloat = 0.75
        let newprogress = progress / newgoal
        let finalProgress = max(0, min(1, newprogress))
        let height = cancelButtonForeground.frame.height \* finalProgress
        let buttonrect = CGRect(x: 0, y: cancelButtonForeground.frame.height, width: cancelButtonForeground.frame.width, height: -height)
        print(buttonrect)
        let mask = UIBezierPath(rect: buttonrect)
        maskLayer.path = mask.cgPath

        switch progress {
        case \_ where progress >= 0.75 && progress < 1:
            let goalScale : CGFloat = 1.3
            let newProgress = (progress - 0.75) / 0.25
            let scaling = 1 + (goalScale - 1) \* newProgress
            cancelButtonForeground.transform = CGAffineTransform(scaleX: scaling, y: scaling)
        case ...0.75:
            cancelButtonForeground.transform = CGAffineTransform.identity
        case 1:
            handleDismissGesture()
        default:
            break
        }
    }
To do this we will use switch statement. In the first case we are checking if the progress is greater or equal to 0.75 and less than 1. case _ where progress >= 0.75 && progress < 1:
The code that follows is where we are changing the scale.
  let goalScale : CGFloat = 1.3
  let newProgress = (progress - 0.75) / 0.25
  let scaling = 1 + (goalScale - 1) \* newProgress
  cancelButtonForeground.transform = CGAffineTransform(scaleX: scaling, y: scaling)
The goal for the scale is 1.3. We want to increase the size of the button 1.3 times on both X and Y axis. Now we want to calculate the scale value as the person scrolls. So first get the progress value which will again be between 0 and 1. This time we are sure it will not cross 1 so there is no point of using min and max methods here.
let scaling = 1 + (goalScale - 1) \* newProgressThe scaling is done by subtracting the goalScale (1.3) from 1 and multiplying it with newProgress which will be a value between 0 and 1. Then add 1 to it since we want to enlarge it. Use the transform property and assign it CGAffineTransform.
In the case ...0.75 block we will make sure that the transform value is .identity or 1. The three … dots that precedes the case means that the progress value should be less than 0.75.
In the last case 1 block, we will call handleDismissGesture() that dismisses the pop up view.
 @objc func handleDismissGesture() {
        guard let window = UIApplication.shared.keyWindow else { return }
        let width = window.frame.width - (padding \* 2)

        UIView.animate(withDuration: 0.3) {
            self.blackView.alpha = 0
            self.actionView.frame = CGRect(x: self.padding, y: window.frame.height, width: width, height: self.height)
        }
    }
and we are now done! 🎉🎉
This is what we get now: