How to create Twitter card-like menu using Swift (Part 1)
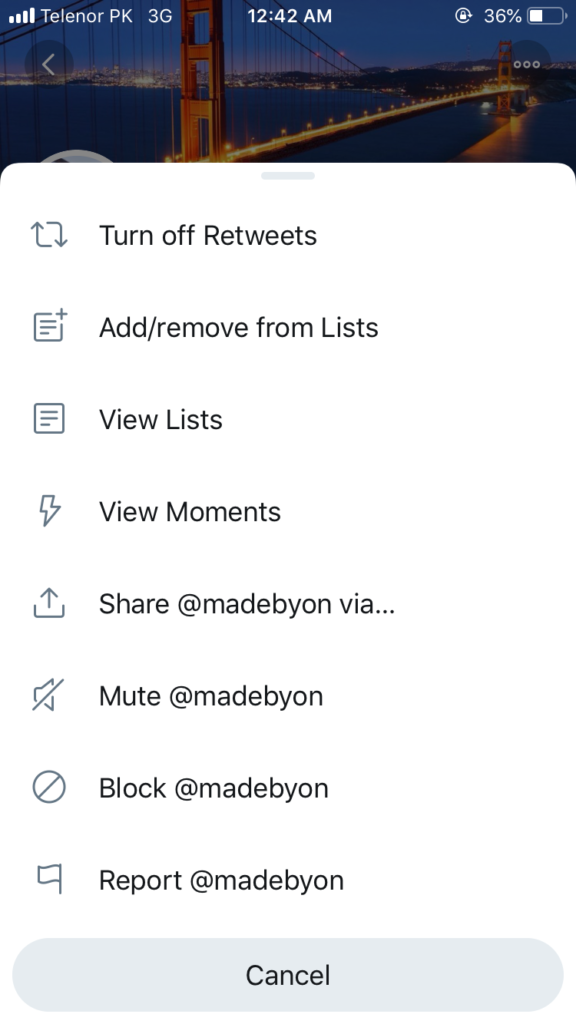
Let’s create this Twitter card-like menu interface that you can invoke by tapping on the three dots on the top right hand cornerwhen you visit someone’s profile. The initial setup is simple by creating a custom UIView which you can populate with buttons or a table view or whatever you want. I will go over that bit some day later. The main topic of discussion will be the gesture and dragging.
The code for this project is available on Github here.
Assuming you have created a UIView, we will set up it’s constraints like so:
bottomAnchorConstraint = card.bottomAnchor.constraint(equalTo: view.bottomAnchor, constant: cardHeight)
        bottomAnchorConstraint?.isActive                                    = true
        card.leftAnchor.constraint(equalTo: view.leftAnchor).isActive       = true
        card.rightAnchor.constraint(equalTo: view.rightAnchor).isActive     = true
        card.heightAnchor.constraint(equalToConstant: cardHeight) .isActive = true

//bottomAnchorConstraint is a variable that I initialized on top and it's of type NSLayoutConstraint?

 var bottomAnchorConstraint: NSLayoutConstraint?
 let cardHeight = UIScreen.main.bounds.height \* 3/4
 var startingConstant : CGFloat = 0
Setting the card’s bottom anchor to this variable will allow us to change it’s value later on during animation. The cardHeight is 3/4 the size of the screen (something you can change) and startingConstant is initialized to zero. More on this later.
Okay now it’s time to animate. The first thing we will do is to set up UIPanGestureRecognizer on the card view.
card.addGestureRecognizer(UIPanGestureRecognizer(target: self, action: #selector(handlePanGesture(sender:))))
To get the full power out of this, make sure you use handlePanGesture(sender: ) selector function.
In the selector function we can call sender.state and execute code depending upon the state at which the gesture currently is.
 switch sender.state {

        case .began:
            startingConstant = (bottomAnchorConstraint?.constant)!
        case .changed:
          let translationY = sender.translation(in: self.card).y
         self.bottomAnchorConstraint?.constant = startingConstant + translationY

         case .ended:
          if (Int((self.bottomAnchorConstraint?.constant)!)) < 0 { UIView.animate(withDuration: 0.2) { self.bottomAnchorConstraint?.constant = 0 } } else if sender.velocity(in: self.card).y > 0 {

                //Card is moving down
                if (sender.velocity(in: self.card).y < 300 && Int((self.bottomAnchorConstraint?.constant)!) < 180)
                {
                    card.animateCardFlow(duration: 0.3, constraint: bottomAnchorConstraint!, constant: 0, initialSpringVelocity: 3, usingSpringWithDamping: 0.9) { \[unowned self\] in
                        self.view.layoutIfNeeded()
                    }
                } else {
                    card.animateCardFlow(duration: 0.5, constraint: bottomAnchorConstraint!, constant: cardHeight, initialSpringVelocity: 0.6, usingSpringWithDamping: 0.9) { \[unowned self\] in
                        self.view.layoutIfNeeded()
                        self.testFlag.toggle()
                    }
                }
            }else {

                //Card is moving up
                card.animateCardFlow(duration: 0.3, constraint: bottomAnchorConstraint!, constant: 0, initialSpringVelocity: 3, usingSpringWithDamping: 0.9) { \[unowned self\] in
                    self.view.layoutIfNeeded()
                }

            }
        default:
            break
        }
This is the selector function. It’s a lot of code but it’s really simple. We are using the switch statement and checking three cases.
.began: In this case we are setting the startingConstant to bottomAnchorConstraint variable constant.
.changed: In this we are using the translation method to move the constraint as the user swipes.
.ended: In this case, we will be using another UIPanGestureRecognizer method of .velocity to check the direction of swipe.
Let’s discuss .changed in detail:
 case .changed:
          let translationY = sender.translation(in: self.card).y
         self.bottomAnchorConstraint?.constant = startingConstant + translationY
sender.translation.y is providing the change in points as the person drags on the view. Those points are added to the startingConstant which is assigned to the bottomAnchorConstraint.constant.
In .endedcase:
I am using an extension to the UIView called animateCardFlow that does all the animation for me. Here is the snippet:
extension UIView {
    func animateCardFlow(duration: TimeInterval, constraint: NSLayoutConstraint, constant: CGFloat, initialSpringVelocity: CGFloat, usingSpringWithDamping: CGFloat, completion : @escaping () -> ()) {

        UIView.animate(withDuration: duration, delay: 0, usingSpringWithDamping: usingSpringWithDamping, initialSpringVelocity: initialSpringVelocity, options: .curveEaseInOut, animations: {
            constraint.constant = constant
            completion()
        })
    }
}

          if (Int((self.bottomAnchorConstraint?.constant)!)) < 0

                { UIView.animate(withDuration: 0.2) {
                 self.bottomAnchorConstraint?.constant = 0 }
                } else if sender.velocity(in: self.card).y > 0 {

                //Card is moving down
                if (sender.velocity(in: self.card).y < 300 && Int((self.bottomAnchorConstraint?.constant)!) < 180)
                {
                    card.animateCardFlow(duration: 0.3, constraint: bottomAnchorConstraint!, constant: 0, initialSpringVelocity: 3, usingSpringWithDamping: 0.9) { \[unowned self\] in
                        self.view.layoutIfNeeded()
                    }
                } else {
                    card.animateCardFlow(duration: 0.5, constraint: bottomAnchorConstraint!, constant: cardHeight, initialSpringVelocity: 0.6, usingSpringWithDamping: 0.9) { \[unowned self\] in
                        self.view.layoutIfNeeded()
                        self.testFlag.toggle()
                    }
                }
            }else {

                //Card is moving up
                card.animateCardFlow(duration: 0.3, constraint: bottomAnchorConstraint!, constant: 0, initialSpringVelocity: 3, usingSpringWithDamping: 0.9) { \[unowned self\] in
                    self.view.layoutIfNeeded()
                }
If the bottomAnchorConstraint constant is above the center / original point when the gesture ends, bring the view back to zeroth location.
 if (Int((self.bottomAnchorConstraint?.constant)!)) < 0

                { UIView.animate(withDuration: 0.2) {
                 self.bottomAnchorConstraint?.constant = 0 }
                }
Else if the sender.velocity is greater than 0, that means the card is moving downwards. If the card is moving downwards but at velocity less than 300 points per second and the position of the card is still above 180 points, then the card show go back to the top position:
 if (sender.velocity(in: self.card).y < 300 && Int((self.bottomAnchorConstraint?.constant)!) < 180)
      {
         card.animateCardFlow(duration: 0.3, constraint: bottomAnchorConstraint!, constant: 0, initialSpringVelocity: 3, usingSpringWithDamping: 0.9) { \[unowned self\] in
          self.view.layoutIfNeeded()
     }
else if the speed is more than 300 or the card is already more than half way down then bring the card all the way down and dismiss it.
else {
        card.animateCardFlow(duration: 0.5, constraint: bottomAnchorConstraint!, constant: cardHeight, initialSpringVelocity: 0.6, usingSpringWithDamping: 0.9) { \[unowned self\] in
          self.view.layoutIfNeeded()
          self.testFlag.toggle()
     }
If the sender.velocity < 0 the card is moving up so move the card back to the top:
else {
                //Card is moving up
                card.animateCardFlow(duration: 0.3, constraint: bottomAnchorConstraint!, constant: 0, initialSpringVelocity: 3, usingSpringWithDamping: 0.9) { [unowned self] in
                self.view.layoutIfNeeded()
      }
This is what you will get with the above code:
So here is how you can create the card interface with full dragging ability. I will keep working on this and you can expect part 2 of this tutorial next week where we make list of buttons and improve the details and stretching behavior even further.
Make sure to check out my other tutorials on iOS programming and algorithm solving!